THIS WEBSITE HAS BEEN ARCHIVED!!! NEW WEBSITE IN CONSTRUCTION
In this page I will just list some random crap from Battlefield 1.
The airplane and cavalry pages are WIP so don't expect much
First off, here is a small walkthrough for the campaign missions. They are really easy on medium but there are still some tips to save a lot of time.
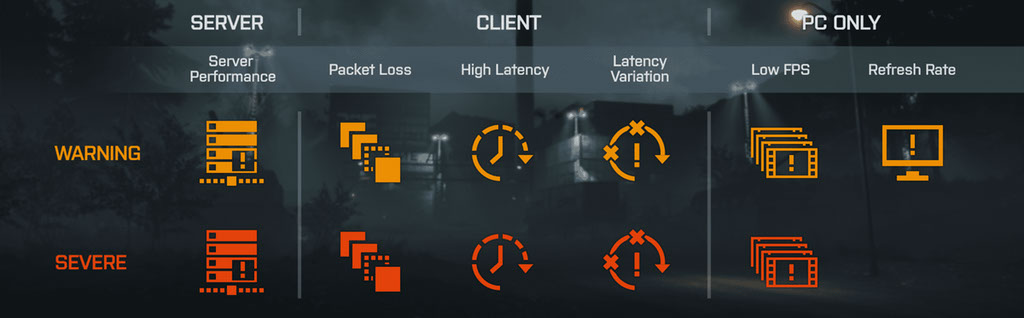
Here is what all of the symbols seen on the side of your screen mean. I get the severe high latency thing all of the time sigh :(
Here are some *general* tips for improving your BF1 gameplay :^)
There is far more specific and "useful" information in the specific categories ^
- FREAKING GIVE PEOPLE AMMO AND HEALTH PACKS IF YOU'RE SUPPORT OR MEDIC. And freaking revive people as medic. It is beyond infuriating to wait for a medic who's within 10 meters of you to revive you only for him to do nothing or run away, wasting your time. YOU CHOSE TO PLAY MEDIC, FUCKING REVIVE YOUR BROS, DAMN.
- If you chose to have a repair tool in your loadout, FUCKING USE IT. Otherwise you're wasting a slot that could have been used for a mortar or ammo crate. Scrub.
- Gas, smoke, and incendiary grenades combined with a Support loadout with ammo packs/ammo crates makes for a spammy fun time. Seriously though, you can fucking blanket an objective in gas with just a few people, and doing it with smoke is incredibly effective given that the grenades will restock before the original smoke clouds completely clear. If you can get just two or three people to help you with this tactic, it can be incredibly effective.
- PLAY THE FUCKING OBJECTIVE IN OBJECTIVE BASED MODES. THIS ISN'T TDM, CUPCAKE, GO FUCK YOURSELF.
- Destroy the behemoth when it comes. Now, I get it, some people are going to be medics the whole time, or scouts the whole time, and this doesn't really apply to them. But if you're assault or support with a repair tool or limpets, fucking help your team and get some easy free points for damaging the train/blimp/boat. Remember, you can put down anti-tank mines on the train tracks and they stay there even after you die, so there's no excuse for not plopping some down, disabling a turret with your AT gun, and then continuing about your day.
- When playing as the behemoth, focus on turrets, tanks, and planes first. Particularly, for the dreadnought, focus on AA guns and any of the double-shot large green turrets, and for the blimp focus on AA guns and then planes. IF YOU DON'T PRIORITIZE YOUR KILLS, YOU'RE GONNA HAVE A BAD TIME.
- COMMUNICATE, GOD DAMN IT. I find someone else with a mic in MAYBE 1/5 squads I join. Even with randoms, working together over mics can vastly improve your collective effectiveness. You can tell each other where enemies are, where health or ammo is, details about objectives, warnings, coordinating attacks and defenses, ad infinitum. Even if you don't have a mic, you can use the command wheel to let your squad know you're here and you're paying attention. Request orders if your squad leader forgets, say thanks for ammo or health drops, etc.
- You can kill a mortar or AA gun user by standing in front of/on top of their mortar/gun. Try not to be a dick and only use this when someone has already been a huge dick and deserves to get fucked. Note about the mortar: If you place a mortar down as support, then leave it, and somebody else gets on it, if you resupply and get another mortar and put it down, the other person will die. Not a common situation, but mildly interesting.
- Put AT mines in small craters, or on dark patches/in puddles, and they will be very, very difficult to see. For tank drivers, it is a good idea to get into the habit of regularly spotting the ground in front of you to check for mines. Also be very careful driving over friendly mines, because if any explosion happens near them while you're also near them, you're going to get fucked over.
- If there are four medics in your squad, you don't need to be a medic, and at least one to two of your squadmates are probably idiots. Fucking casuals.
- UNLOCK YOUR FUCKING SQUAD. WE ARE SICK TO FUCKING DEATH OF SEEING 7 SQUADS WITH 2 PEOPLE EACH. You unlock your squad by going to the squad menu and pressing some button (probably triangle/Y). I don't know, I don't lock my fucking squad, look at the screen and figure it out.
- Numbers will win in small battles if both sides are similarly skilled, but if one side is much more skilled and communicates, even a small number (2-3) can take out a squad or two. Lessons learned: be skilled, communicate.
- Medics: HEAL YOUR FUCKING ELITES! They are stupid powerful, but only if you keep them alive, goddamnit! An elite with two medics following him around can wreck almost anything but a tank.
- (Thanks to a commenter for this tip) Medics can see the skull symbol of a freshly dead soldier through smoke grenades (and sandstorms, fog, etc.). This can potentially be used to your advantage, although having only two smokes at a time limits the usefulness.
- Elites: Don't fuck with tanks, unless you are a tank hunter. They are bigger and better than you with the flame trooper or sentry kit, and they can run you over no problem. Bullets do nothing to tanks and flames do just minor damage. Take advantage of chokepoints, medics, (most medics are scrubs and you will have to heal yourself around them, basically) and advantageous terrain.
- The medic crate heals one at a time, while the medic pack/pouch heals in increments of around 10-15 (I forget. Too much time in tanks)
- Assault: Use your AT gun on the train. Focus your fire on one turret; you can disable a turret if you land all four shots with the AT gun. This is much better than just damaging the train generally.
- Use field guns. Focus on tanks first. Note that you need to press R2/RT or square/X to reload after firing the field guns. These can be a real fucking pain in the ass to deal with if the user is reasonably skilled, particularly for tanks which will take at least 2 hits before locating and returning fire on the gun. These can also be used to destroy walls for strategic purposes (eliminating cover or opening paths).
- The blimp's mortar/rockets are fucking LIT, dog. Seriously, a couple shots can destroy a heavy tank. These are super powerful, keep that in mind in how you choose to use them (maybe don't bother the one infantry dick in the trees and instead take out the tank that is fucking us, u nomsayin)
- THE SCOUT CLASS IS CALLED SCOUT AND NOT SNIPER FOR A REASON. FUCK YOU, MOUNTAIN SITTING, STILL LAYING, USELESS ASS FUCKS. UNLESS YOU'RE ACTUALLY SPOTTING OR KILLING A TON OF ENEMIES, OR SERVING AS A REALLY WELL PLACED SPAWN POINT, YOU'RE A WASTE OF BATTLEFIELD OXYGEN
Map specific tips:
- Destroy the doors around objective B on Argonne Forest with limpets or grenades if people keep fucking opening and closing them and generally being fucknuggets about them. Also a fantastic map for gas/incendiary/smoke spam. Smoke specifically can be hugely useful in intense battles over C.
- Try to keep control of E and F as much as possible on Fao Fortress (the two objectives inside the fortress). The fort has a field gun that can do major damage with a skilled user, as well as huge strategic importance for positioning, field guns facing the behemoth, and a flame trooper kit. While on defense with these objectives, keep in mind that enemies can be lurking behind the fortress acting as spawn points for their squad, and that enemies can get on top of castle walls and become somewhat difficult to deal with. Use gas and incendiary grenades to get rid of them if this happens. Make sure to clear the tunnels connecting F and E if you get an enemy infestation (yes, there is a tunnel system connecting F and E. Go through the door on the wall at E)
- Tanks can turn the tide of battle on Suez due to the compactness of the action. Be prepared to change to assault and get rid of the tanks as quickly as possible if you don't want to be pushed back to your home objective. Mortars are also very effective due to the openness of the sand areas around B and C.
- Use tanks to destroy walls in order to find enemies or just eliminate cover (for example, on Amiens, if starting with A as the closer flag, it is a good idea to destroy as many walls as possible in the houses at the flag. You should be able to keep A relatively easily, so not having a lot of cover will be worse for the enemy than for you.
- Tanks are also critical on Amiens. Ideally you should have at least one or two infantry solely supporting you as the tank, and I recommend using the heavy tank with flamethrower due to the cramped alleyway battles that dominate the map.
- YOU CAN FIT A HEAVY TANK INTO OBJECTIVE E ON AMIENS. A HEAVY TANK WITH FLAMETHROWERS. YEAH. "You're welcome." - DICE
- You can destroy the arch on Sinai near A with tank shots/dynamite/plane crash/generic explosions. It takes a little while though.
- THERE ARE FUCKING TUNNELS AND SHIT ON MONTE GRAPPA AND EMPIRE'S EDGE. INSTEAD OF SITTING AROUND WITH YOUR FIST IN YOUR ASS WHILE CAPPING A CONTESTED FLAG, FIND THOSE MOTHERFUCKERS AND KILL THEM.